Go Beyond Your Camera: Just Because You Can
Big things come in small packages; in this case, that statement is a lot more literal. Before you snap that perfect shot you always gotta make sure the resolution of your camera is at its most logical setting, as always there are a few guidelines to any adjustments you plan to make regarding your camera’s digital capture.
Okay, so in order to really understand these techniques you have to be able to try them out yourself, right? There’s no way you can walk up to someone on the street and show someone a picture of your wife, your kids, your dog and tell them that the current quality of the photos are crisp and clean because that’s just a bold-faced lie right there. Hell will freeze over before you can prove to someone that 11X16 inches at 300 ppi to 44x66 inches at 300 ppi is gonna look super-duper amazing! It’s not gonna turn any heads until you show them what’s what.
If you are already careless when it comes down to photographic ingenuity and you want to increase your files in size to the biggest they can go, that’s gonna come back to kick you in the teeth especially if the image was already poorly captured to begin with and the resolution not at the required level of quality. There are a lot of nice looking things out there that make use of shaky cams, crappy lenses and bad cropping, but most of the time it’s done on purpose in order to get across a certain kind of effect to the audience or viewer. The Bourne series of movies is a PRIME example of shaky cam at it’s finest. But you know what? Life is NOT a shaky cam, if this is the quality of your captured files than you will lose a lot of its value because it could be potentially distorted or pixilated and that will ruin any image you hope to take. Simply put, those didn’t need to be there to begin with.
These are not simply ideas that were made up on a whim, no. These ideas are represented by a higher authority-in this case the camera companies. Who else? The various methodologies about to be presented have been phased through their company’s official channels so they are legitimate but you can take them or leave them, clearly up to you.
If you want your digital camera to reach its peak resolution there is quite a useful method. The images you will most likely work with are presented at specific zoom ratios in Photoshop CS2. Simply cropping real images will already degrade what you will be looking at on the screen without even clicking on the print preview icon from the file menu shows you EXACTLY how something is gonna come out of your printer. Of course even with print preview you still won’t know how it’ll look on conventional paper though once it’s printed. That leads into the next point, not everyone has a high-resolution camera but there IS a way to make those low-res shots look and feel like high-resolution, it all starts with the size.
Say you had a relatively small to moderate sized photograph with low-end 6-mega pixel D-SLR. This camera used an 18-55mm lens while other cameras, like the 16 mega pixel camera had a high-end 47-70mm lens. They are both very nice lenses for the cameras they are made for but the 24-70mm kicks the tar out of the other two and that’s not just because of its heavy price-tag.
Camera Raw 3.1, as part of PhotoShop CS2, processed all the images with significantly less changes made; there was no sharpening or luminescent smoothing of the image done the default color noise reduction was 25. All previously processed RAW files were then converted to DNG RAW format.
At its original resolution of 3072 x 2048 pixels the 6-megapixel resolution matched that of the 16-megapixel resolution of 4992 x 3328 pixels using the “Bicubic Smoother” option of CS2’s Image Size. This is almost like competition when two very predominant things like Photoshop and Camera Raw have it out in terms of dishing out a more soothing product. Before CS got really popular there were other alternatives upping the resolution of an image, such an alternative was the Camera Raw’s algorithm, of course this was BEFORE the famous Bicubic Smoother became an option on Photoshop’s list of useful tools and most seem to agree that Photoshop outdoes the Camera Raw on more occasions then not.
Applying the same noises settings as the 6-megapixel capture the 16-megapixel was processed with no clear edits. The finished test was as most would have expected, the 6-megapixel capture is a lot smoother with very little textual decay. But the reality is simple; you want something done really well and easy? Good luck with that, it’s gonna take a lot of work to truly get that desired look.
Sharpening is a key aspect of image editing in Photoshop in which there are many ways to access sharpening mechanisms but for this particular example we will only work with the same as day “Unsharp Mask” At this point the image is HUGE at a whopping 200% zoom capacity, that’s big, really big.
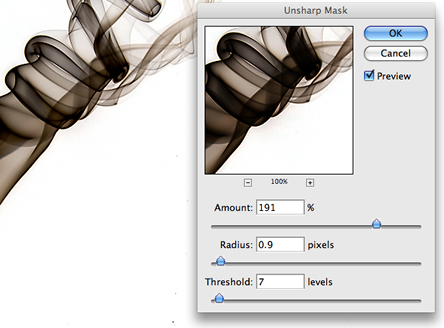
For the 16-megapixel capture we are going to use the same settings, 200% and en even larger number for the 6-megapixel capture: 400%. Miraculously both conjured the same Radius of .5 pixels with no Threshold produced. The amount you have produced is specific to any given image and in no way reflects how sharpening can really be done; there are many other ways to do sharpening, this one is just a little more simple.
Set the background layer to Luminosity and but beforehand make sure you duplicate the background layer once you have done this take a look at your files and notices all of the different changes made. Now you know at this point you CAN up the resolution of a 6-megapixel digital capture proving once and for all that you are able to gain a higher resolution from a lower resolution camera but only after meeting certain boundaries that allow you to do so. Such boundaries being the size of the output file, you can up the resolution of a 6-megapixel to 16-mega pixel file in which would produce a pretty nice output when you print it at 16.6x11 inches at 300 ppi.
The normal resolution image of a 16-megapixel has more textual abnormalities but you can up the resolution of a 6-megapixel image and it shall produce everything much smoother than the 16. At about a 50% zoom you may asses the images coming out to a result of 300 ppi to a 150 lpi halftone screen.
You would assume that the 16-megapixel camera is the clear better choice here but if you have a 6-megapixel you could potentially outplay a 16 with a few minor setbacks mainly that of the output size. The 16 looks nice, really nice but the 6, surprisingly, looks nice too once it reaches its reproduction size. Let’s say you want to go even further with an edit of the 6-megapixel image, most would say that once you go beyond the set amount the details will start to decay and erode and look very sloppy and incomplete. How can we fix this? Ask and you shall receive.
Firstly, you need to get to know your resolutions as there are many kinds of resolutions suitable for different kinds of images. There are three main kinds of resolutions: real resolution (Normal), native resolution and interpolated resolution. This is kind of ironic because native resolution is actually more-so a interpolated resolution or at least it captures that style more-so then what it was meant for but that’s neither here nor there. This kind of resolution can be applied to a “Bayer pattern” grid with photosites galore all of varying colors ranging from red, green and blue, there are four of these that are interpolated to put together the image data for a singular pixel. Before you decide on an interpolation resolution think for a second about the native resolution and how it offers the same results only better thus bringing the case to court that “real” resolution isn’t real after all.
A 6-megapixel capture is actually very well endowed in any way you wish to do a resolution. But if you set a native resolution to 180 ppi, you can get to about an 11x17-inch print on inkjet printer but this works better on a matte or textured media system. On the other hand, if the resolution ratio were changed to 480 ppi you could potentially receive an amazingly crisp and detailed 6x4-inch image on premium glossy paper. The objective is to use the native resolution as many times as you can possible fathom as it is the most usable and respectable of all the resolutions. That being said depending on the kind of paper you have will determine your sharpening because matte and glossy are two completely different sets of paper. Images at about 180 ppi will need a substantial sharpening difference standing at 480 ppi.
The best resolutions in any given situation would 180 ppi, 240, ppi, 288 ppi, 360 ppi and 480 ppi. It may sound like an opinion but this is based upon actual studies and research done by the pixel company PixelGenius and various other companies who all agree that the above numbers are the most in-tuned ppis. A professional grade inkjet printer called Epson is debatably 360 dpi-meaning the physical resolution at the printer’s ink nozzle. So based upon the opinions of others going to 360 ppi is unnecessary and dumbfounded of course this is only after they already said 240 and 300 were a waste as well but not in the average Joe’s typical image workout.
Some people wonder to themselves: “How big can one of these digital captures get?” Well, depending on certain factors such as the quality and parts of the camera you can arguably attain a 200% up-res interpolation and even reach the highest peak of Everest at 400% if all goes well. Of course something like this may cause you to have to “bend the rules” so to speak. Don’t worry you won’t be breaking any real laws!
Filter the image through the Camera Raw and make sure no sharpening or luminous noise reductions are on and keep the color noise settings at a simple 25. After that you gotta increased the settings of the Bicubic Smoother and put it to either 200% or our favorite number 400% set as the up-res interpolation. After the process is complete and depending on how much resing you did a group of sharpening routines should have been deployed. After that, choose the “PhotoKit” sharpener and combine a high resolution capture sharpen to apply an initial sharpening. Choose the Creative Sharpen phase of a Super Sharpen 1 and 2 as well as Super Grain 1 or 2. This is where you bend the rules a bit, just don’t tell anyone.
When you add this Grain you are in actuality adding a slight high-frequency texture on top of the resulting interpolation and additional sharpening. This makes it look like it’s slicing the image up into a kind of puzzle in a way that makes the image seem more unique or be it less smooth then it was prior. Add one more Output sharpening layer on top of the other sharpening and grain texture make sure it is at the proper optimized level of line screen ruling: 150 lpi while the image resolution should be set to 300 ppi.
In the beginning of the Digital age most digital cameras were very small in stature compared to how they are today, their size did not compensate for their capture either as it was kind of a gunky shot. A common technique was born out of that and it was called Step Interpolation. This required many passes of Image Size in Photoshop to be at an applicable 10% incremental increase in resolution per each pass. For some reason people were really astounded by such a thing as normal-folk would say “Since when did doing multiple passes get better then singular?” Well, the truth is in the pudding. And it taste good.
“Bicubic” means the interpolation method was looking double the axes which explain the “Bi” part of the word, and then using four sub sampling pixels, which equates to the “cubic” part. Doing many passes of Bicubic looked to increase the sub sampling and resulted in a superior up-resolution interpolation. Predominantly for digital captures from CFA cameras with Bayer array sensors. Not only did this up the resolution, a nice smoothing effect was added as well to aid the digital captures. You see the things you can get for free just from learning? Isn’t that nice? Yeah, it’s nice, really nice.
Though not as insane and full to the brim as Photoshop’s Image Size function, Camera Raw’s interpolation was much better than Photoshop’s (Seems to be a rarity). Keep in mind though this was during Photoshop 7’s era and not everything was up to snuff in terms of technology at the time so Camera Raw gets a bit of a pass on this one. If two people were working on the same problem utilizing both Camera Raw and Photoshop they’d come to the conclusion that interpolation algorithm is an optimal tool for smaller images minus any and all of the extra film grain attached, this came down to the conclusion that they were pretty much just simple digital captures.
The main conclusion is whether you up the resolution in Camera Raw or later in PhotoShop CS or 2, you will get an image setting that essentially is created for the sole purpose of up-resing digital images. You want to be assertive with the image so it can have some clean sharpening routines. Some of the already stationed algorithms HAVE a certain set of sharpening precisely built in beforehand.
All in all, Camera Raw and Photoshop are capable of A LOT more than you or me or anyone would know, they have the potential to go to even higher levels without distorting the quality of the image, only thing you’d have to do is play around with it and decide for yourself how the quality of your picture will come out, just make sure you have the right kind of paper.
You never know how something will come out if you do NOT have the right kind of paper, seriously, Glossy or Matte will do you some good as mentioned before for they WILL bring out the best effect imaginable, just hope you don’t screw it up before you print it.

