Four Exciting Ways To Edit Your Photographs
The second most important thing about photography nowadays is understanding that post-processing doesn’t come in the darkroom anymore. But that doesn’t mean there isn’t a lot you can do with proper photo-processing software.
After all, photographers could have manipulated their images in a great number of ways in the darkroom, why shouldn’t we do the same, but with our little type of darkroom – Adobe Photoshop and Adobe Lightroom. We’ll focus on a couple of techniques to use in Adobe Photoshop, and we won’t go through very complicated tasks, since this is a book about the beginnings of portrait photography.
1. How To Make Pop-Art Photos
Andy Warhol is probably best known for his pop-art series and with his prints of Marilyn Monroe he certainly changed the way we see pop art, and how we perceive a certain smash in colors. The main characteristic of pop-art images is their completely abstract and minimalized outlook and an added dash of color that pushes the abstract even further. This effect is quite easy to achieve now, in the digital age, therefore we’ll go through the steps for a moment.
First, open your image in Adobe Photoshop – you don’t need to have a clear background, just a square crop of a portrait. Crop until you feel comfortable with the selection and open it as a new image. Invert colors, and use the Plaster or Stamp Tool from the Filter Gallery.
Now, give it a little color using the DuoTone setting. Select the two colors you want to overlap, and just take a look at what happened. If you want to do the 4-windows kind of image, all you have to do is play around with the tool a little more, and obtain 4 similar images, but with different colors, stack them all together and voila!
2. Converting To Black and White
Black and white photography always has a certain strength if done right. There is something about the lack of color that when compensated with powerful subjects, changes everything. Now, converting to black and white can be as simple as desaturating the image.
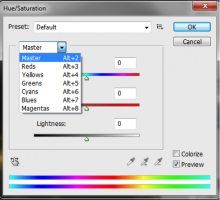
However, considering the fact that we want more from our photograph, it would be wise to use Channel-based desaturation in Adobe Photoshop. This way, you can control what gives it more contrast which areas remain stronger after desaturation and so on. Go to the Hue/Saturation option in the Image/Adjustments menu, and consider the sliders:
Take the slider for each color, and push its saturation to a minimum while working with the Hue and Lightness sliders to create more atmosphere. By the time you’re done with each color option, the result should be quite satisfactory.
3. Sharpening Images for A Crisper View
Using the Unsharp Mask for crisper views is an interesting and efficient way to create sharper photographs. If you do things the right way, it can be an incredibly powerfull tool that will bring a lot more power to your image. Aside from the Unsharp Mask, you can use the Smart Sharpen tool and add even more punch.
The one thing you should be really careful about is the noise. Over-sharpening your images might help you bring that punch to your image, but it can also ruin it in terms of quality. Even if you go as far as to select the problematic area and sharpen just that particular selection, the difference might be large enough to create a poor contrast with the rest of the image. With portraits, it would be wise to consider localized sharpening for facial features (eyes especially).
4. Growing Small Images
We all know how to resize large images and turn them small again. But what are we to do when we want to turn small images larger and larger? There are two basic methods to do this. One of them uses Photoshop, and one of them uses a free Web Application called VectorMagic.
Regardless of which solution you choose, the result will be the same – transforming your small image into a larger one. When dealing with portraits, it’s important to understand that keeping everything sharp and in-focus is very important.
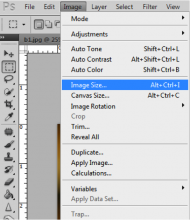
Therefore if you plan on enlarging a portrait, make sure you compensate with a couple of local sharpenings since the image will certainly use part of its sharpness and become soft. If you want to use Photoshop to enlarge an image, all you have to do is change its image size in a step-by-step manner.
Depending on the size of the original file, you can use different increments. For images that are originally 3000x2000, you can choose increments as high as 100-150px max. Decrease the pixel increment in tandem with the image size.


